
Auto Bus Waveform
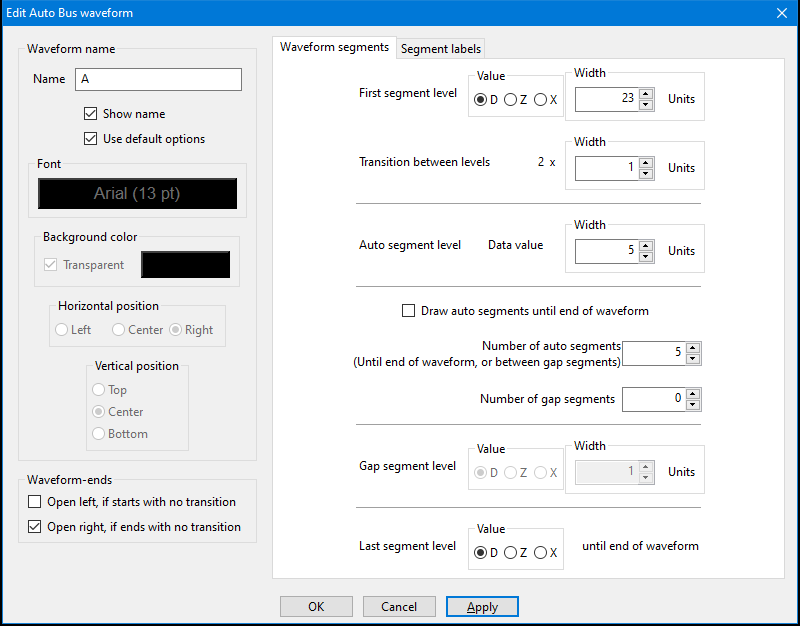
Edit Auto bus waveform dialog (Waveform segments tab shown)
|
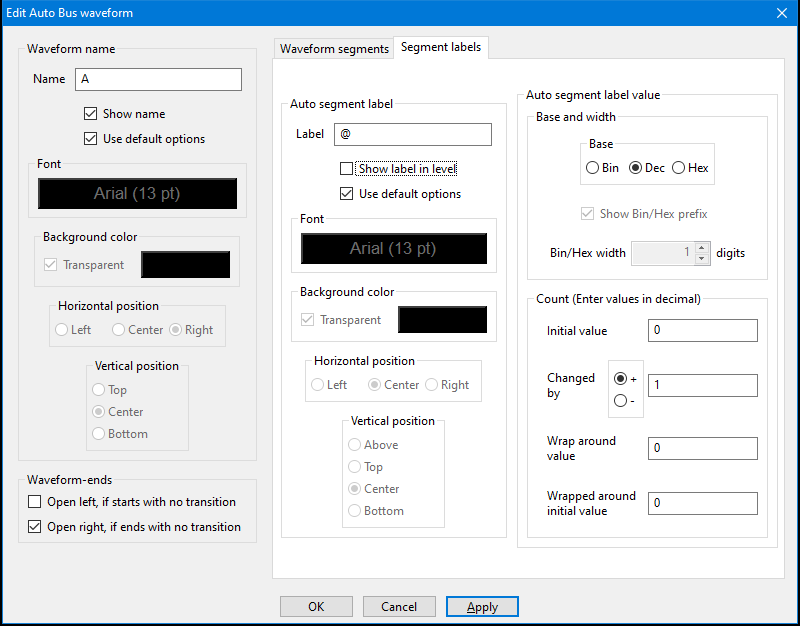
Edit Auto bus waveform (Segment labels tab shown)
|
An Auto bus waveform is automatically drawn for you, as a repeated pattern.
As opposed to a Bus waveform, it is not made of individually editable segments.
Add a new Auto bus waveform row
Menu: Add | Auto bus
Shortcut: Alt+U
This will create a new row with the Auto bus' name on the left, and a waveform on the right. The row can then be moved up and down, edited, duplicated, copied to the clipboard and deleted (see row operations).
Superscript/Subscript
Waveform name and label text can include superscript and subscript portions, e.g.:
Read""Address""
D..@..
Superscript text is surrounded by a pair of quotation marks, and subscript text is surrounded by a pair of dots.
Waveform name
- "Show name" lets you either show or hide the waveform's name.
- A set of options - font, font size, font color, font background color, and name alignment - lets you customize how the name is displayed. Name alignment, horizontal and vertical, is relative to the waveform name region.
The initial values of this set come from the Waveform options dialog (Diagram | Waveform options). If you want this set's values to ALWAYS match those in Waveform options dialog, select "Use default options". Otherwise, uncheck the box to individually customize each of these options.
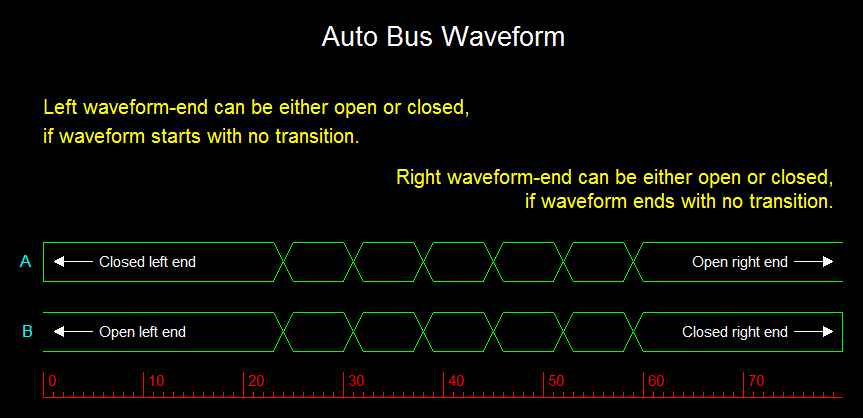
Open/Closed ends
Select whether the ends of a waveform are drawn with a closing vertical line or left open. This feature applies to D and X segments that start/end without a transition.
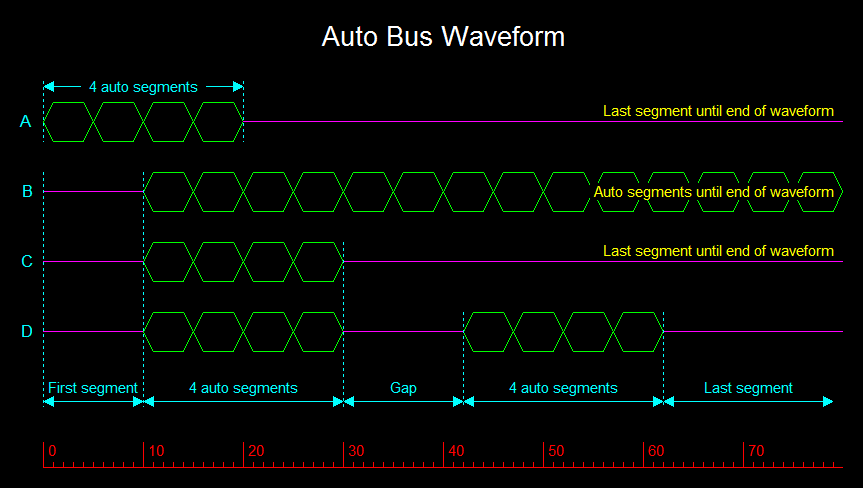
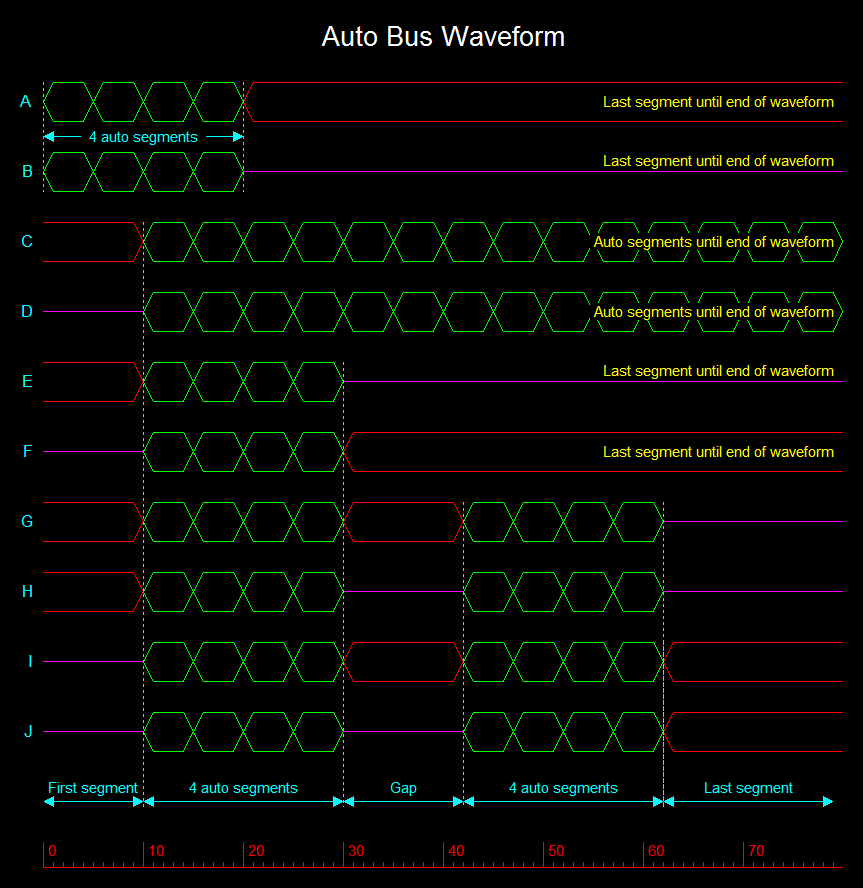
Auto bus parts
An Auto bus has three distinct parts, all of which are optional:
A first segment, followed by one or more series of auto-generated segments, followed by a last segment.
Data (D), High-Z (Z) and Don't care (X) value colors and fill styles are set in the Waveform options dialog (Diagram | Waveform options).
Let's look at each of these parts more closely.
First segment:
An Auto bus can start with a first segment level (D, Z or X), that transitions into a series of auto-generated segments.
Transition between levels:
The transition width from segment level to segment level is identical between any two segments, and is specified as an even number of units. Half of those units transition from level to mid-point, and the other half from mid-point to the next level.
Transition width can be zero or more units.
Auto-generated segments:
Each auto-generated Data (D) segment is made of 3 parts,
transition from mid-point to level, level, and transition from level to mid-point.
The level part must be at least one unit wide.
If "Draw auto segments until end of waveform" is selected, the series of auto-generated segments continues until the end of the ruler.
If "Draw auto segments until end of waveform" is not selected, the user needs to indicate the desired "Number of auto segments" in a series. The user can also select to insert a gap segment (D, Z or X) between every two auto generated series. And finally, after all the auto-generated series end, a last segment level is drawn.
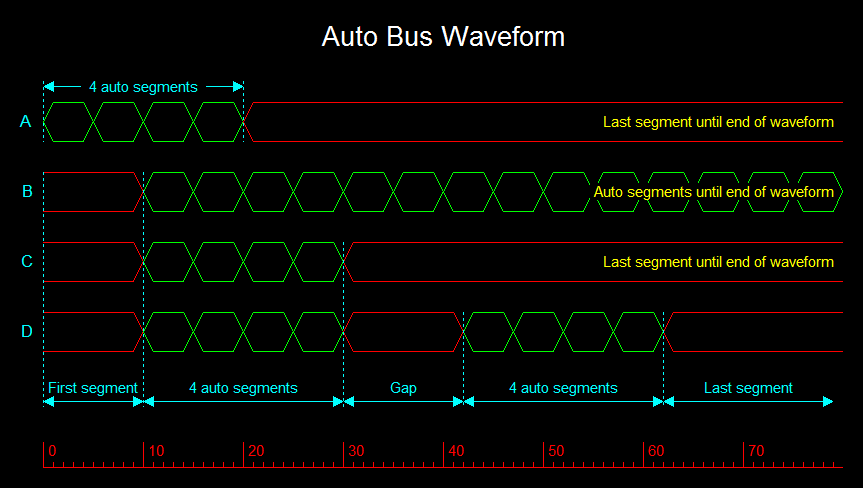
Here's an example:
Setting the following,
"Draw auto segments until end of waveform" deselected,
"Number of auto segments" = 5, and
"Number of gap segments" = 0,
will create a single series of 5 auto segments, followed by a last segment.
If we then set
"Number of gap segments" = 1,
it will create 2 series of 5 auto segments, with a gap segment between the the 2 series, followed by a last segment.
Last segment:
The last segment (D, Z or X) is only drawn if "Draw auto segments until end of waveform" is deselected.
The last segment is drawn after all the auto generated segment series end, until the end of the ruler.
Best effort drawing:
The various parts of the Auto bus are drawn progressively, space permitting.
Waveme attempts to draw the first segment, followed by all the auto generated segment series, and finally the last segment. Drawing stops at the end of the ruler, which might be too short to show all the waveform's parts. In that case, either make the waveform shorter or the ruler longer.
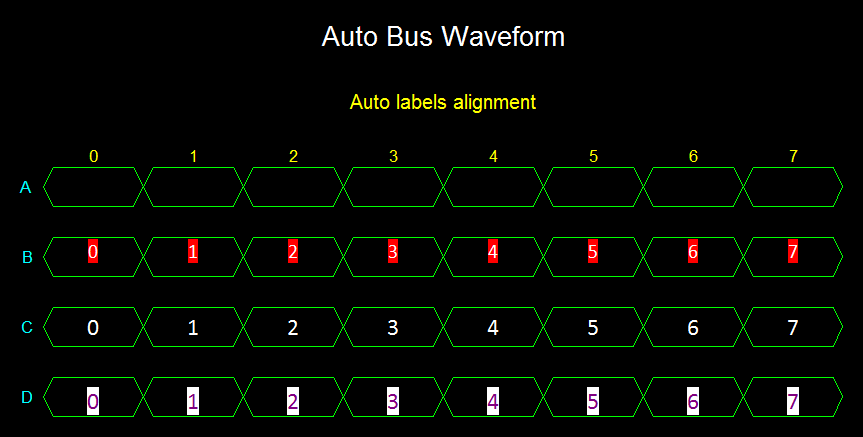
Auto segment label
You can select to display an auto generated numeric label, within the level part of each auto generated segment (excluding gap segments).
Use the character @ as a stand-in for the numeric value.
If you want the label to include the @ character, you'll need to escape it with the \ character: \@.
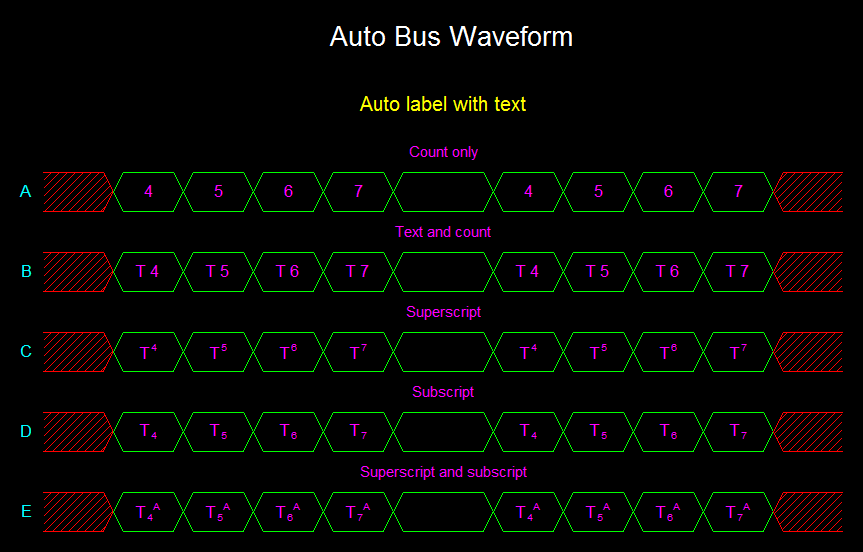
And, the @ character can be surrounded by other text, and all text can be used with postscript and subscript notation.
For example:
Label text, D@, that starts at 0 and increments by 1, will create auto labels: D0, D1, D2, ...
Label text, D\@@, with the same settings, will create auto labels: D@0, D@1, D@2, ...
Label display:
- "Show label in level" lets you show or hide all segment labels.
- Select which auto segment levels (high, low or both) show labels.
- A set of options - font, font size, font color, font background color, and label alignment - lets you customize how segment labels are displayed. Label alignment, horizontal and vertical, is relative to the level part of an auto generated segment.
The initial values of this set come from the Waveform options dialog (Diagram | Waveform options). If you want this set's values to ALWAYS match those in Waveform options dialog, select "Use default options". Otherwise, uncheck the box to individually customize each of these options.
- Define numeric label value base (Binary, decimal or Hex), start and wrap around values, and progression (increment or decrement).
Label numeric value:
Select
- The numeric base (Binary, Decimal or Hex);
- Whether to show base prefix (Binary is b, and Hex is 0x); and
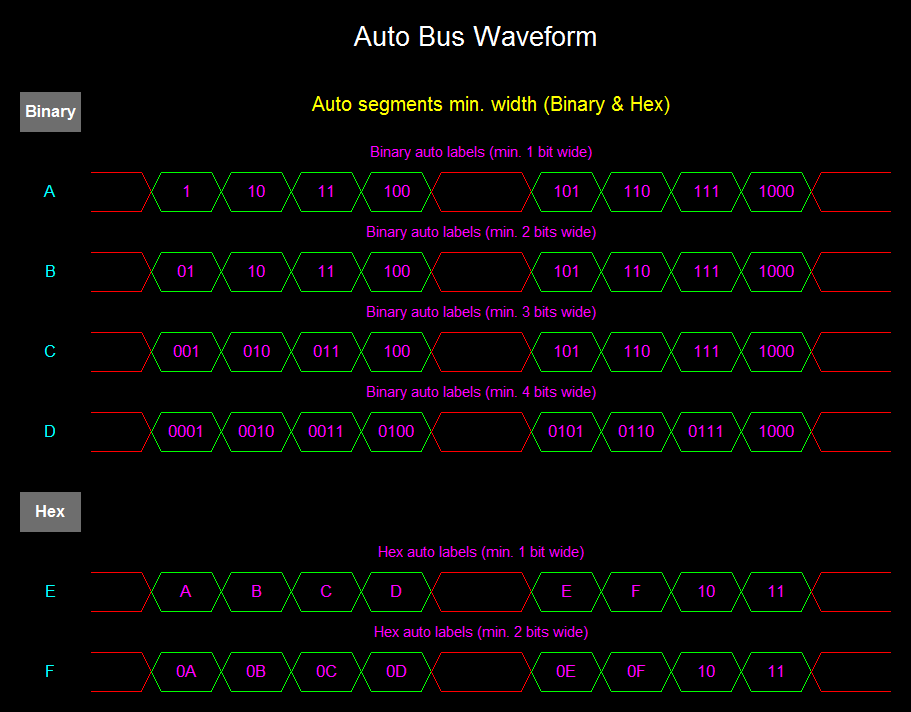
- The minimum number of characters in a displayed value (Binary and Hex only). If a value doesn't require as many characters, zero (0) is used as a filler.
To set counting, select
- The "Initial value", which is the numeric value of the very first label;
- By how much a value changes from one label to the next, (increment or decrement);
- The value beyond which a value is wrapped around, instead of continuing to progress as before.
Note: Setting the wrap around value to zero (0) with an increment, will NOT wrap around numeric values; and
- The wrapped around value (allowing you to wrap around to a value that is different than the "Initial value").
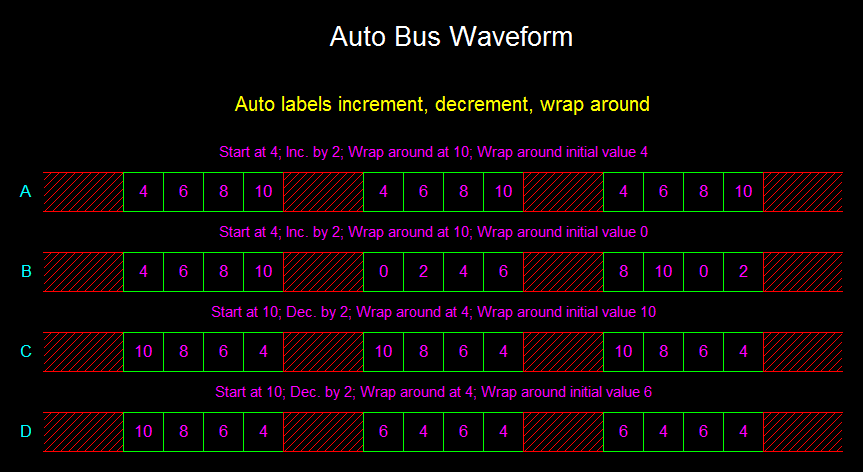
For example:
Setting initial value to 4, increment by 2, and wrap around value 0, will show the numeric values:
4, 6, 8, 10, 12, 14, ... and will not wrap around.
Same settings with wrap around set to 10, and wrapped around initial value of 0, will show the numeric values:
4, 6, 8, 10, 0, 2, 4, 6, 8, 10, 0, 2, 4, 6, 8, 10, 0, ...
As opposed to a Bus waveform, it is not made of individually editable segments.
Add a new Auto bus waveform row
Menu: Add | Auto bus
Shortcut: Alt+U
This will create a new row with the Auto bus' name on the left, and a waveform on the right. The row can then be moved up and down, edited, duplicated, copied to the clipboard and deleted (see row operations).
Superscript/Subscript
Waveform name and label text can include superscript and subscript portions, e.g.:
Read""Address""
D..@..
Superscript text is surrounded by a pair of quotation marks, and subscript text is surrounded by a pair of dots.
Waveform name
- "Show name" lets you either show or hide the waveform's name.
- A set of options - font, font size, font color, font background color, and name alignment - lets you customize how the name is displayed. Name alignment, horizontal and vertical, is relative to the waveform name region.
The initial values of this set come from the Waveform options dialog (Diagram | Waveform options). If you want this set's values to ALWAYS match those in Waveform options dialog, select "Use default options". Otherwise, uncheck the box to individually customize each of these options.
Open/Closed ends
Select whether the ends of a waveform are drawn with a closing vertical line or left open. This feature applies to D and X segments that start/end without a transition.
Auto bus parts
An Auto bus has three distinct parts, all of which are optional:
A first segment, followed by one or more series of auto-generated segments, followed by a last segment.
Data (D), High-Z (Z) and Don't care (X) value colors and fill styles are set in the Waveform options dialog (Diagram | Waveform options).
Let's look at each of these parts more closely.
First segment:
An Auto bus can start with a first segment level (D, Z or X), that transitions into a series of auto-generated segments.
Transition between levels:
The transition width from segment level to segment level is identical between any two segments, and is specified as an even number of units. Half of those units transition from level to mid-point, and the other half from mid-point to the next level.
Transition width can be zero or more units.
Auto-generated segments:
Each auto-generated Data (D) segment is made of 3 parts,
transition from mid-point to level, level, and transition from level to mid-point.
The level part must be at least one unit wide.
If "Draw auto segments until end of waveform" is selected, the series of auto-generated segments continues until the end of the ruler.
If "Draw auto segments until end of waveform" is not selected, the user needs to indicate the desired "Number of auto segments" in a series. The user can also select to insert a gap segment (D, Z or X) between every two auto generated series. And finally, after all the auto-generated series end, a last segment level is drawn.
Here's an example:
Setting the following,
"Draw auto segments until end of waveform" deselected,
"Number of auto segments" = 5, and
"Number of gap segments" = 0,
will create a single series of 5 auto segments, followed by a last segment.
If we then set
"Number of gap segments" = 1,
it will create 2 series of 5 auto segments, with a gap segment between the the 2 series, followed by a last segment.
Last segment:
The last segment (D, Z or X) is only drawn if "Draw auto segments until end of waveform" is deselected.
The last segment is drawn after all the auto generated segment series end, until the end of the ruler.
Best effort drawing:
The various parts of the Auto bus are drawn progressively, space permitting.
Waveme attempts to draw the first segment, followed by all the auto generated segment series, and finally the last segment. Drawing stops at the end of the ruler, which might be too short to show all the waveform's parts. In that case, either make the waveform shorter or the ruler longer.
Auto segment label
You can select to display an auto generated numeric label, within the level part of each auto generated segment (excluding gap segments).
Use the character @ as a stand-in for the numeric value.
If you want the label to include the @ character, you'll need to escape it with the \ character: \@.
And, the @ character can be surrounded by other text, and all text can be used with postscript and subscript notation.
For example:
Label text, D@, that starts at 0 and increments by 1, will create auto labels: D0, D1, D2, ...
Label text, D\@@, with the same settings, will create auto labels: D@0, D@1, D@2, ...
Label display:
- "Show label in level" lets you show or hide all segment labels.
- Select which auto segment levels (high, low or both) show labels.
- A set of options - font, font size, font color, font background color, and label alignment - lets you customize how segment labels are displayed. Label alignment, horizontal and vertical, is relative to the level part of an auto generated segment.
The initial values of this set come from the Waveform options dialog (Diagram | Waveform options). If you want this set's values to ALWAYS match those in Waveform options dialog, select "Use default options". Otherwise, uncheck the box to individually customize each of these options.
- Define numeric label value base (Binary, decimal or Hex), start and wrap around values, and progression (increment or decrement).
Label numeric value:
Select
- The numeric base (Binary, Decimal or Hex);
- Whether to show base prefix (Binary is b, and Hex is 0x); and
- The minimum number of characters in a displayed value (Binary and Hex only). If a value doesn't require as many characters, zero (0) is used as a filler.
To set counting, select
- The "Initial value", which is the numeric value of the very first label;
- By how much a value changes from one label to the next, (increment or decrement);
- The value beyond which a value is wrapped around, instead of continuing to progress as before.
Note: Setting the wrap around value to zero (0) with an increment, will NOT wrap around numeric values; and
- The wrapped around value (allowing you to wrap around to a value that is different than the "Initial value").
For example:
Setting initial value to 4, increment by 2, and wrap around value 0, will show the numeric values:
4, 6, 8, 10, 12, 14, ... and will not wrap around.
Same settings with wrap around set to 10, and wrapped around initial value of 0, will show the numeric values:
4, 6, 8, 10, 0, 2, 4, 6, 8, 10, 0, 2, 4, 6, 8, 10, 0, ...


|
|
