
Bus Waveform
|
A Bus waveform is made of individual segments.
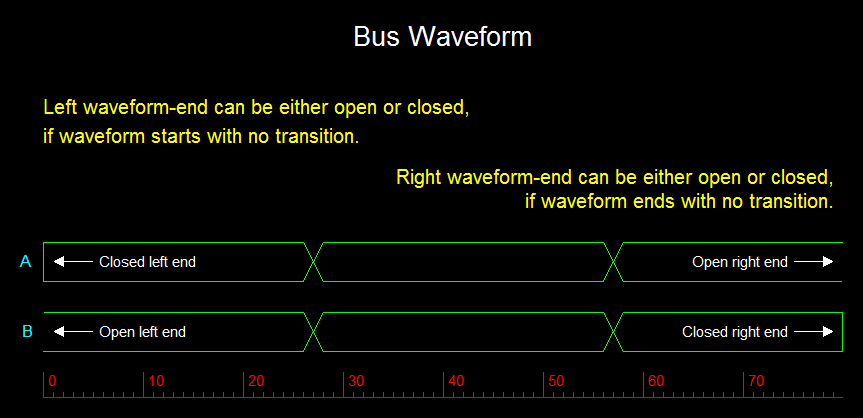
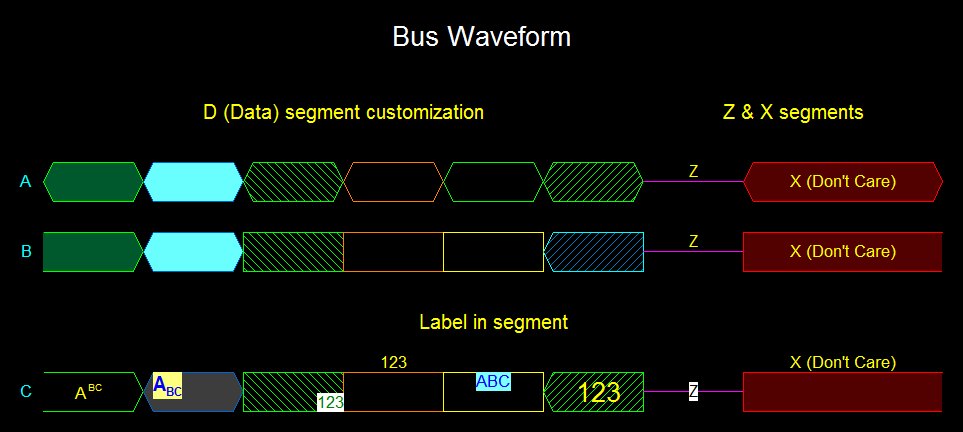
Each segment contains 3 parts, Transition to level, level, and transition from level, in that order. A label can be shown in the level part of each segment. A level part can be one of 3 values, Data (D), High-Z (Z) or Don't care (X). Any of the 3 parts can be of zero units width, but not all. Thus, a segment is of a width of at least one unit. For Z values, there is no difference between any of the 3 parts. They all get drawn as a straight line. Begin by adding a new Bus waveform row Menu: Add | Bus Shortcut: Alt+B This will create a new empty row with the bus' name to its left (if "Show name" is checked). The row can then be moved up and down, edited, duplicated, copied to the clipboard and deleted (see row operations). Continue by adding individual segments to this waveform (see Signal & Bus Operations). Bus options: - Select to show or hide the waveform's name with "Show name". - A set of waveform name options include a choice of font, font color, font background color, and text alignment (horizontal and vertical) relative to the waveform region in that row. - Select whether the ends of a waveform are drawn with a closing vertical line or left open. This feature applies to D and X segments that start/end without a transition. - Select whether to show or hide the labels of ALL the waveform's segments. This choice overrides the individual "Show label in level" control, that each segment's label has. Segment options: - Level value selection (D, Z or X). - Segment width, 2 transitions and level parts, in units. - Segment value colors and fill style. You can customize the looks of D segments, but not Z or X to preserve their visual meaning. - Select to show or hide the segment's label with "Show label in level". - A set of label options include a choice of font, font color, font background color, and text alignment (horizontal and vertical) relative to the segment's level part. Initial values for - The set of waveform name options, - Value colors and fill, - Segment width, and - The set of segment label options, come from the Waveform options dialog (Diagram | Waveform options). If you check the "Use default options" box above a set of options, those options will be affected by any change made to them in the Waveform options dialog. This allows you to define the looks of multiple rows across the entire diagram. Otherwise, uncheck the box to individually customize each of those options. Superscript/Subscript
Bus name and segment label text can include superscript and subscript portions, e.g.: a""n"" t..RC.. Superscript text is surrounded by a pair of quotation marks, and subscript text is surrounded by a pair of dots. |

Edit Bus waveform dialog
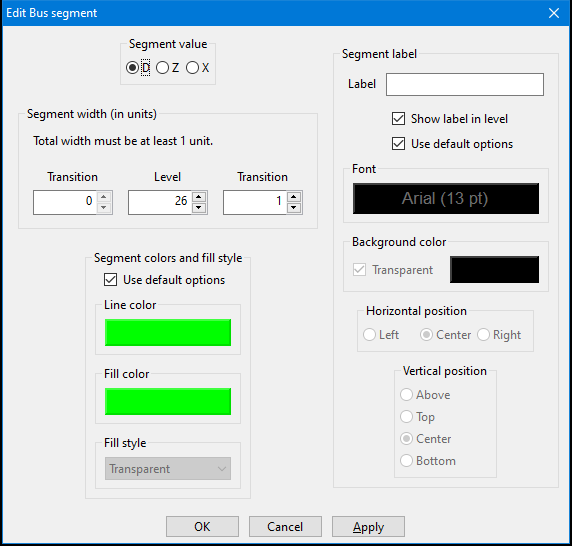
Edit Bus segment dialog
Quick segment width change
You can increase or decrease a digital segment's level part, or an analog segment's width without opening the corresponding segment dialog.
Increase/decrease by 1 unit at a time, via: - Mouse dragging: (1) Bring the mouse to hover anywhere within the segment area. You don't need to select the segment. (2) Press and hold down the left mouse button. (3) Drag the mouse either right to increase, or left to decrease. (4) Release the left mouse button. The minimum distance, in pixels, that you'll need to drag, is set in the Diagram | General options dialog. Or, select a segment, and then use either: - Toolbar buttons - Keyboard shortcuts: + Increase, - Decrease - Main menu Segment commands - Segment context menu: Press the right mouse button. |
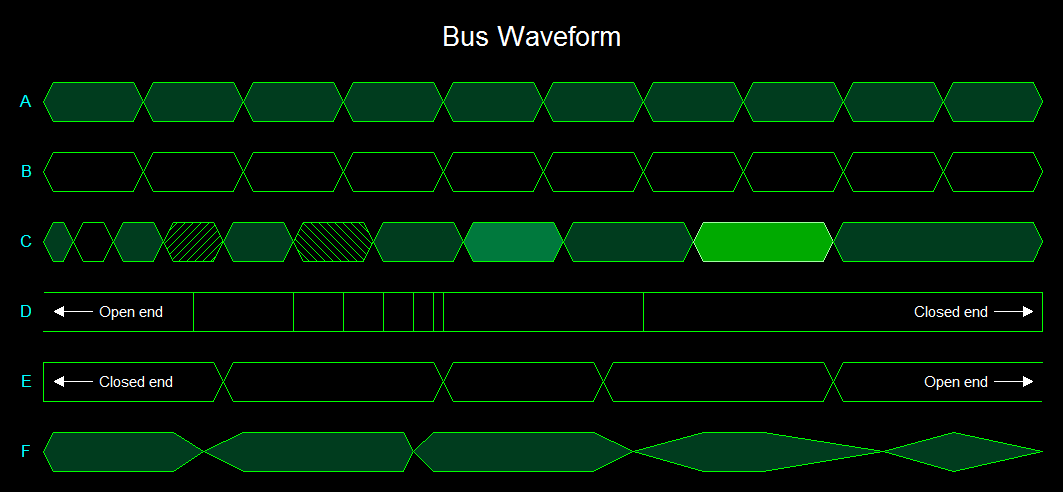
Transition (to and from level), and level widths are independently set for each segment.
|
Data (D) segment colors and fill style can be customized on a per-segment basis.

|
